
Eve Dev Diary (April 2016)
Corey Montella - 30 Jun 2016
UI
In March we revisited GridEve, adapting it to fit more in line with the ethos of Eve; GridEve had a runtime based on data-flow, instead of the relational model we ultimately want. What we liked most about GridEve was the immediate usefulness of the grid model, so we decided to marry that with a relational engine in a new project: WikiGrid. In the last update, we looked at some interaction-level details of WikiGrid. Now, I’ll show some of our ideas about how the relational model can fit in a grid world.
Querying with Grids
One obvious possibility is just to have relational functions and to allow the user to write them in cells. But that doesn’t really take advantage of the relational nature of the Eve platform – you could do this in any language. Eventually, we stumbled upon a really simple yet absolutely cool idea: give semantic meaning to cell adjacency. Consider this:
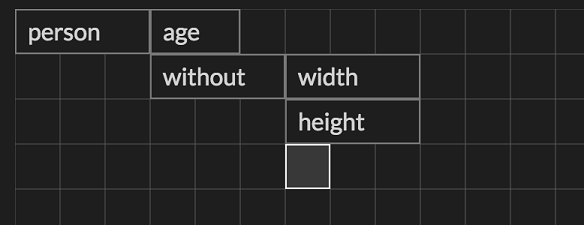
Here, the cell person means “select all the entities tagged person”. The adjacent cell age means “select the attribute age for the adjacent collection” i.e. person.age, which returns the set of all ages of “person”s in the system.
Building under that, we use a reserved word without, an alias for the anti-join operator. The adjacent blocks width and height mean person.width and person.height. So the overall query will select all entities with a “person” tag and an attribute age, that do not have width or height attributes.
In textual form, this would be written:
(query [age]
  (fact name :tag "person" :age)
  (not
    (fact name :tag "person" :width :height))
This was very exciting for us, because you could basically write out a complicated query with no syntax. This was by far our fastest way to write a query yet. Here’s what writing one of these looks like in WikiGrid:
Here, we mark off a 5x4 area as a macro cell. Then we name the macro cell “test” and give it a “Formula Grid” type. If you look closely at the autocomplete that pops up, you’ll see the cell can take on many types: table, code, image, text, chart, drawing, etc. Most of these weren’t wired up yet, but it illustrated the idea that cells can contain anything.
So let’s put it all together and see how it works when it’s hooked up to an evaluator. The runtime in this example was our new Clojure runtime from last month.
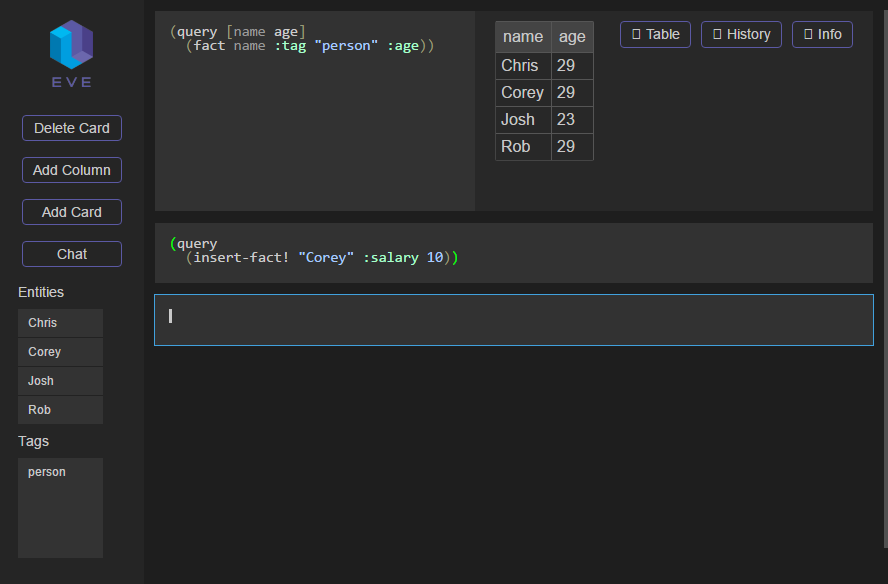
We start out in a grid and name it “Chris” by adding an attribute cell. Each grid represents a single entity, so any attributes added to the grid are attached to that entity. Grids start out nameless, so giving it a name provides a handle to the grid. We then add two more attributes: an age and tag. The tag attribute is a convention used to group similar entities. By adding the tag “person”, we are now able to talk about collections of “person”s by joining on that tag.
Next, we create a formula grid, and we query for person.age. The result of the query shows up in the bottom half of the formula grid as we type. Chris is the only result, since he’s the only entity in the system, so let’s add some more.
Chris has a friend named Rob, so we add him as a new entity under chris.friend. We then navigate to Rob’s grid, which was automatically created when we added Rob as a friend of Chris. Now we just add rob.age and rob.tag and he shows up in the formula grid. We can do the same thing for Chris’ other friend Bob, and we see he is added as well.
This is a relatively simple example, but we can write arbitrarily complex queries this way:
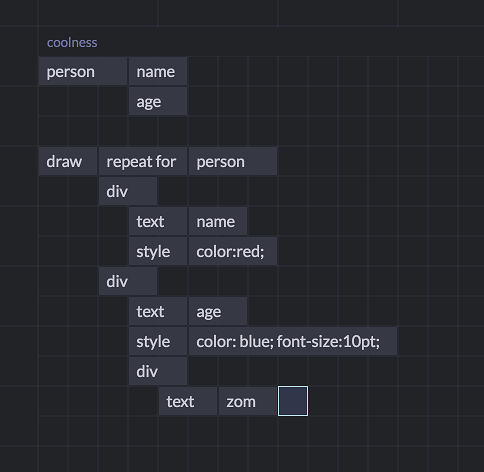
This query draws the name and age of a person in HMTL. The name is in one div, styled red, while the age is in another div, styled blue.
Platform Work
Language
We added more language features to the runtime, including choose, not, and various aggregates.
Choose
The choose statement works kind of like an if statement in other languages; it has multiple arms, one of which is evaluated based on a condition. For us, each arm is its own sub-query. The condition for evaluation is whether or not there are any results in the sub-query. The first arm of the choose with a result is the one that gets evaluated, so this is one case where order does matter in Eve. Take a look at this example:
(query [grade score]
  (fact name :score)
  (choose [grade score]
    (query
      (>= score 90)
      (= grade "A"))
    (query
      (>= score 80)
      (= grade "B"))
    (query
      (>= score 70)
      (= grade "C"))
    (query
      (>= score 60)
      (= grade "D"))
    (query
      (> score 0)
      (= grade "F"))))
Here, we are assigning a letter grade given a numerical score. The choose statement itself has its own projection, so you can decide which variables internal to the choose are accessible in the parent query.
Not
The not statement is an anti-join operator. Its body is a query, and any results within are excluded from the parent query. For instance:
(query [names]
  (fact names :tag "person")
  (not
    (fact names :tag "employee")))
will return all of the entities tagged “person” that are not also tagged “employee”.
Aggregates
We got some aggregates working for this version as well. Aggregates work just like regular functions, except they can change the cardinality of the output. So sum takes in a set of cardinality N and returns a set of cardinality 1. You have to keep this in mind, or your results might not be what you expect (something we didn’t really like. We later found better semantics for aggregates, which I’ll talk about in a future post). Here is an example of sum in practice:
(query [sum-result]
  (fact e :score)
  (= sum-result (sum score)))
This will store the sum of all the scores in sum-result.
REPL (github)
The REPL received a visual overhaul and several additional features. First, let’s take a look at the new layout.
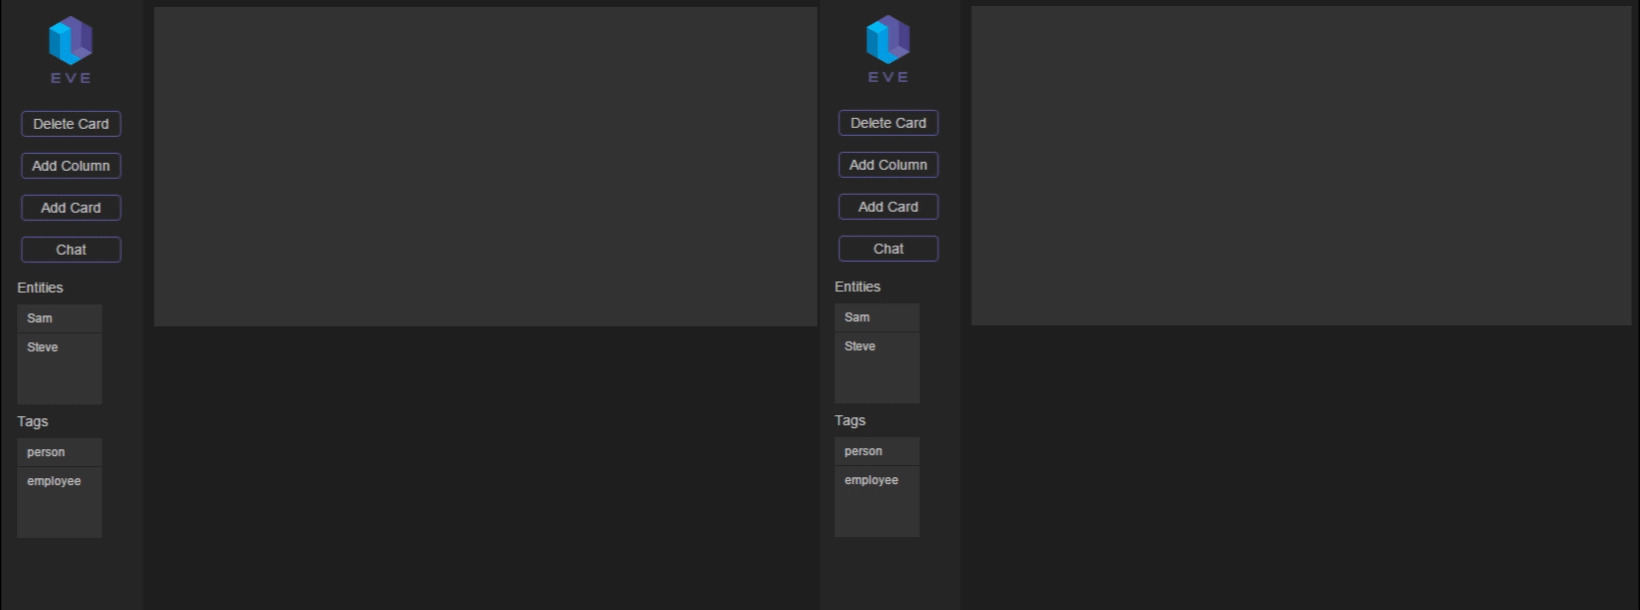
You can immediately see some new features here. First, we’ve changed the layout a little. We have a toolbar on the left, and the REPL “cards” on the right. We have a button to get another column of cards, which gives us a restricted grid layout.
While the REPL is still written in Typescript, we’ve bootstrapped several elements. On the side, we have a space to see all the entities and tags in the system. If we click on an entity, we can see its attributes table. If we click on a tag, we can see a list of all entities with that tag (you can see an example of this in the GIF below).
These are supported by two queries that listen for entities and tags:
// get all entities that are not system entities
(query [entities attributes values]
  (fact-btu entities attributes values)
    (not
      (fact entities :tag "system")))

// get all tags that are not also system tags
(query [tag entity],
  (fact entity :tag tag)
    (not
      (fact entity :tag "system")))
The client leaves these queries open, so it continuously receives updates as new entities and tags are added.
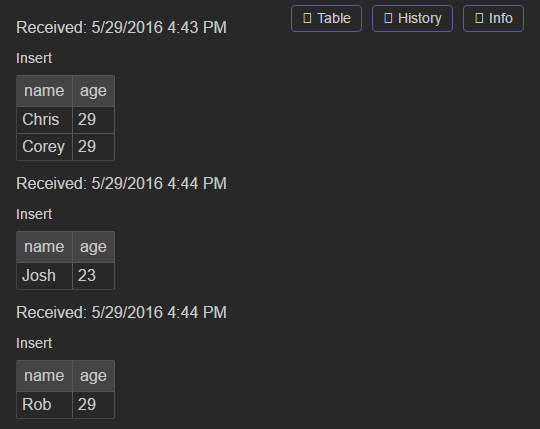
We also added various views to the output. The view defaults to the results table, which displays the current state of the results. You can also see this History, which logs the incremental changes to the table. This is just a local history according to the client, but eventually this will be a history according to the server. This will allow features like the ability to see the state of the table at an arbitrary time.
The info tab displays information from the compiler about the query for debugging purposes. So far, we display the intermediate expansion of the query, as well as Eve bytecode.
We also added a chat system. This required some notion of a user, so we added something quick and dirty. If you try to use the REPL yourself, the first thing you’ll see is a login screen. When you submit a username and password here (use eve/eve), we compare it against the users stored in the Eve DB (obviously this is not secure at all, it was just a proof of concept).
Now that you’ve logged in, you can send and receive messages:
This whole process is also supported by the Eve backend. When you send a message, we add a new fact into the database, containing the message text, as well as your user ID and the local machine timestamp:
(query []
  (insert-fact! "${uuid()}" :tag "system"
                            :tag "repl-chat"
                            :message "${message}"
                            :user "${repl.user.id}"
                            :timestamp "${t}"))
Every other client is listening for new messages:
(query [id user message time]
  (fact id :tag "repl-chat"
           :message message
           :user user
           :timestamp time))
Right now we still have more work to do to draw UI, so the messages are displayed using Typescript. But soon we’ll be able to bootstrap this whole process (actually, if you want to see what a full chat component looks like in our latest sytanx, you can check it out here. This version even has the ability to support multiple channels.).
Build instructions:
If you’d like to try out the REPL yourself, it’s pretty easy to get running. We’ve tested this under Windows 10 and OSX El Capitan, but I don’t see any reason it shouldn’t run under Linux.
- First, you’ll need the following dependencies: Node.js, Clojure, Leinengen.
- Next , clone the Eve repo from this commit.
- Then cd into where you cloned Eve. Download node dependencies and compile the REPL:
> npm install
> npm run dev
- When the REPL is finished building, you can kill that process and cd into the
/serverdirectory. Then, all you need to do is:
> lein run
This will compile and run the server. When it’s finished, you’ll have a REPL hosted at http://localhost:8081/repl. The REPL was developed in Chrome, on Windows, but I’ve also verified it working on Firefox and Edge.
UI Drawing
We also added the capability to specify UI with our syntax, obviating the need for HTML or CSS. We are interested in writing useful tools for ourselves in Eve, so we decided to write a little CI report generator.
(define-ui ci-run-result
  (fact test-run :tag "testrun" :number pr-number :branch :user :title :text description :additions :deletions)
  (fact test-result :tag "testresult" :run test-run :test :result)
  (fact-btu test-result "result" :tick)
  (= test-order (+ 100 (sort tick)))
  (= delta-text (str "(+" additions " / -" deletions ")"))
  (= pr (str "#" pr-number))
  (= url (str "https://github.com/witheve/eve-experiments/pull/" pr-number))
  (= branch-url (str "https://github.com/witheve/eve-experiments/tree/" branch))
  (= user-url (str "https://github.com/" user))
  (= test-class (str "test " result))

  (ui [title pr pr-number url user user-url delta-text branch branch-url description]
      (div :id run-tile :parent "root" :ix pr-number :class "test-run")
      (h3 :id header :parent run-tile :ix 1)
        (div :parent header :ix 0 :class "spacer" :text title)
        (a :parent header :ix 1 :text pr :href url)
      (div :id user-tile :parent run-tile :ix 2 :class "run-info")
        (div :parent user-tile :ix 0 :text delta-text)
        (div :parent user-tile :ix 1 :text "in")
        (a :parent user-tile :ix 2 :text branch :href branch-url)
        (div :parent user-tile :ix 3 :text "by")
        (a :parent user-tile :ix 4 :class "user" :text user :href user-url)
      (blockquote :parent run-tile :ix 3 :class "description" :text description))

  (ui [run-tile test test-class test-order]
      (div :id test-tile :parent run-tile :ix test-order :class test-class)
      (div :parent test-tile :ix 0 :text test)))
It’s pretty simple when you break it down. You can think of the code in two phases. The first phase, we collect all the information necessary to render the cards:
  // Get the test runs and their results. Joins via test-run
  (fact test-run :tag "testrun" :number pr-number :branch :user :title :text description :additions :deletions)
  (fact test-result :tag "testresult" :run test-run :test :result)

  // Sort results by tick order
  (fact-btu test-result "result" :tick)

  // Format some strings
  (= test-order (+ 100 (sort tick)))
  (= delta-text (str "(+" additions " / -" deletions ")"))
  (= pr (str "#" pr-number))
  (= url (str "https://github.com/witheve/eve-experiments/pull/" pr-number))
  (= branch-url (str "https://github.com/witheve/eve-experiments/tree/" branch))
  (= user-url (str "https://github.com/" user))
  (= test-class (str "test " result))
In the second phase, we take the data and display them:
// Draws a commit card. This card is repeated once for every commit
(ui [title pr pr-number url user user-url delta-text branch branch-url description]

    // Attaches the card to the DOM root
    (div :id run-tile :parent "root" :ix pr-number :class "test-run")
    // Draws the header
    (h3 :id header :parent run-tile :ix 1)
      (div :parent header :ix 0 :class "spacer" :text title)
      (a :parent header :ix 1 :text pr :href url)

    // Draws the line "(+{adds}/-{removes}) in {branch} by {user}"
    (div :id user-tile :parent run-tile :ix 2 :class "run-info")
      (div :parent user-tile :ix 0 :text delta-text)
      (div :parent user-tile :ix 1 :text "in")
      (a :parent user-tile :ix 2 :text branch :href branch-url)
      (div :parent user-tile :ix 3 :text "by")
      (a :parent user-tile :ix 4 :class "user" :text user :href user-url)
    // Draws the commit message
    (blockquote :parent run-tile :ix 3 :class "description" :text description))

// Draws the test results. This block is repeated once for every test
(ui [run-tile test test-class test-order]
    (div :id test-tile :parent run-tile :ix test-order :class test-class)
    (div :parent test-tile :ix 0 :text test)))
Here is the result:
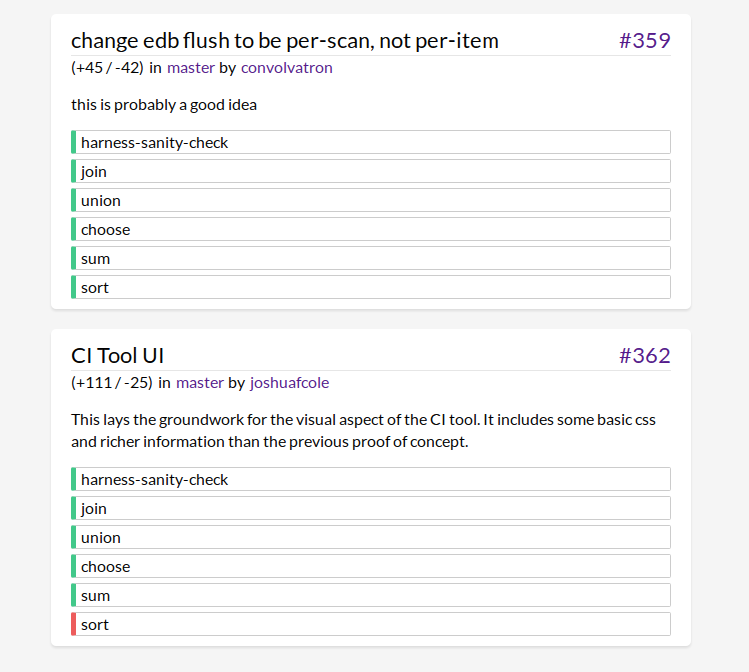
And we did all this in Eve without having to write separate HTML! The result is completely live, so any new commits are displayed as soon as the tests complete.
The two-phase nature of this query (get some data -> do something with that data) is a general pattern we’ve found very useful for both reading and writing Eve programs. In newer versions of the Eve syntax, we make this pattern more explicit.
Moving Forward
This is the last post in our backlog of development diaries. Moving forward, we’ll keep a monthly cadence of dev diaries starting July. To cover our work in May and June, we have some special news, which we will be talking about shortly. As time goes by, and as Eve grows, I hope to keep the blog updated with more features like example Eve programs, community spotlights, tutorials, etc. So stay tuned!